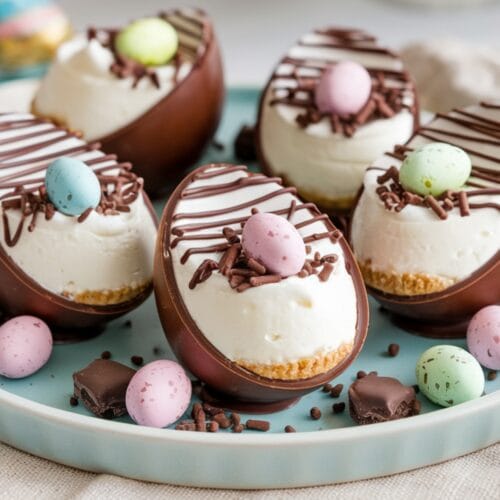
Chocolate Easter Egg Cheesecake Cups
These no-bake Chocolate Easter Egg Cheesecake Cups transform hollow chocolate eggs into edible dessert vessels filled with light vanilla cheesecake. Decorated with colorful mini eggs and chocolate bunnies, they're a stunning Easter treat requiring zero baking skills.
Equipment
- Sharp knife
- Electric mixer
- Large mixing bowls
- Spatula
- Piping bag (optional)
- Small saucepan or microwave-safe bowl (for melting chocolate)
Ingredients
For the chocolate shells
- 4 large hollow chocolate Easter eggs (about 4-5 inches tall)
- 1 tablespoon melted chocolate (for sealing any cracks)
For the cheesecake filling
- 16 oz (2 packages) cream cheese, softened
- 1/2 cup powdered sugar
- 1 teaspoon vanilla extract
- 1 tablespoon lemon juice
- 1 cup heavy whipping cream, whipped to stiff peaks
- 1/4 cup white chocolate, melted and cooled
For decoration
- 1/4 cup chocolate, melted (for drizzling)
- Chocolate shavings (about 1/4 cup)
- 12-16 mini speckled Easter eggs in assorted colors
- 2-4 chocolate bunnies for garnish
- Additional mini eggs for serving
Instructions
- Prep Your Eggs: Carefully slice the top third off each large hollow chocolate egg using a warm knife (heat under hot water and wipe dry). Save these tops if you want to create lids. If any edges are uneven, gently smooth them with your finger or the warm knife.
- Shell Reinforcement: Check your chocolate shells for any small cracks or thin spots. Use a small amount of melted chocolate to patch these up from the inside. Let set for 10 minutes in the refrigerator. (Trust me, chocolate cheesecake soup on your Easter tablecloth is NOT the vibe we're going for.)
- Whip It Good: In a large bowl, beat the softened cream cheese until smooth and fluffy. Add the powdered sugar, vanilla extract, and lemon juice, continuing to beat until completely incorporated. Feeling stressed? Just imagine the cream cheese is whatever's been annoying you lately.
- Chocolate Magic: Fold in the melted and cooled white chocolate. Make sure it's actually cooled – hot chocolate will turn your beautiful cheesecake into a sad, melty mess.
- Cloud-Like Texture: Gently fold in the whipped cream until just combined. Be gentle! We're looking for light and airy, not dense and deflated. Think "folding a cloud" not "mixing cement."
- Fill 'Em Up: Spoon or pipe the cheesecake mixture into each chocolate shell, filling to just below the rim. Smooth the tops with the back of a spoon. Refrigerate for at least 4 hours, but overnight is even better.
- Decoration Station: When ready to serve, drizzle melted chocolate over the tops in zigzag patterns. Sprinkle with chocolate shavings, then arrange colorful mini eggs on top. Place a chocolate bunny on one side of each egg for that ultimate Easter cuteness factor.
Notes
- The key to perfect chocolate egg cups is temperature control. Your cream cheese must be properly softened (leave it out for at least 1 hour), but your whipped cream should be cold. The melted chocolate should be cooled but still fluid.
- For cleaner cuts when halving your filled eggs, dip your knife in hot water and wipe dry between cuts.
- These can be made up to 2 days ahead and stored in the refrigerator. Just add the decorative elements right before serving for the freshest look.
- Mascarpone can replace cream cheese for a richer taste
- Dairy-free cream cheese works if you're avoiding dairy
- Dark, milk or white chocolate eggs all work beautifully
- This recipe contains dairy and may contain traces of nuts depending on your chocolate eggs. Not suitable for vegans or those with severe dairy allergies. If you're serving guests with gluten sensitivities, this is actually a perfect dessert since it's naturally gluten-free (just double-check your chocolate ingredients).