
Let me guess – you want an Easter dessert that makes people gasp when you bring it to the table but doesn’t require a pastry degree to pull off? raises hand enthusiastically
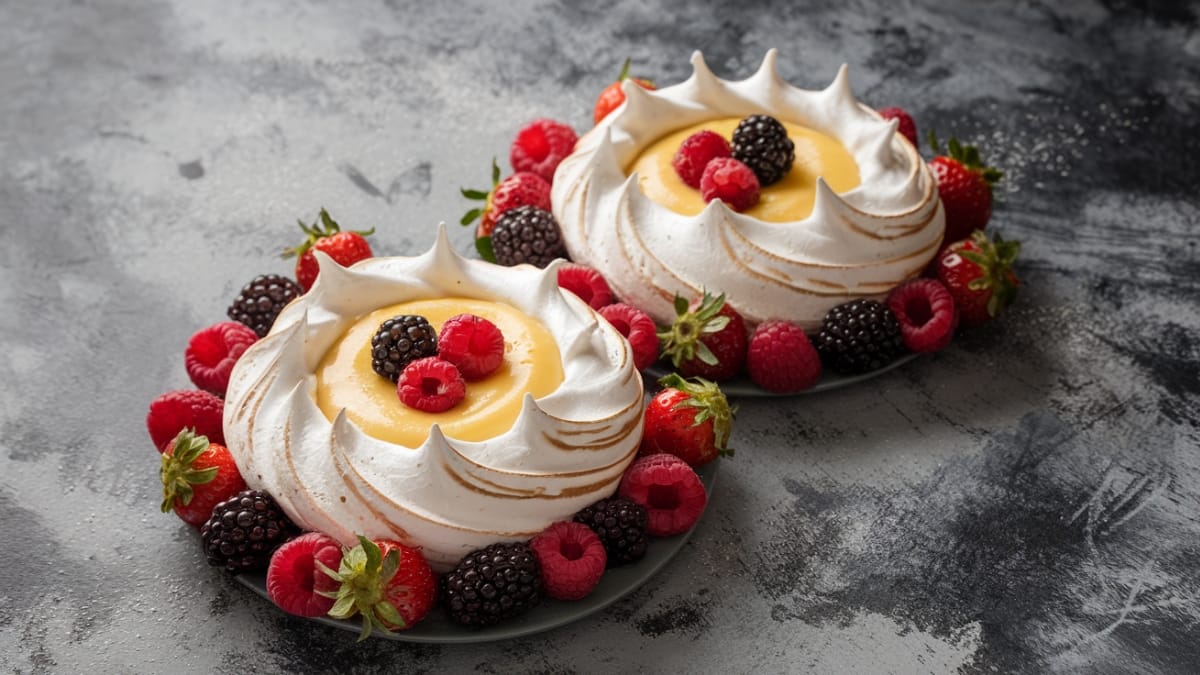
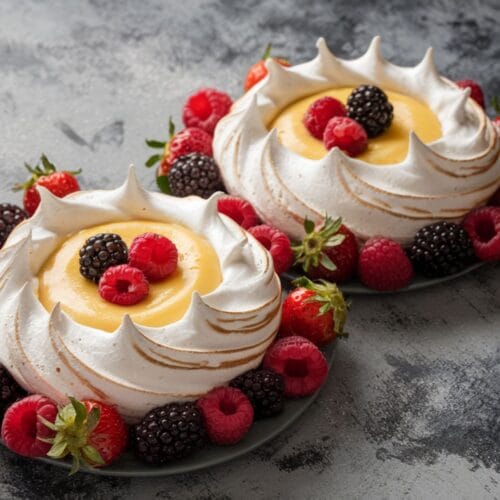
These Easter meringue nests are about to become your secret weapon. They’re basically edible little clouds that cradle tangy lemon curd and fresh berries like they were made for each other (spoiler alert: they were).
The first time I made these for my family’s Easter gathering, my aunt literally asked if I’d bought them from a bakery. When I told her I made them myself, she squinted at me suspiciously until I showed her the leftover egg yolks in my fridge. #VindicationIsSweet
Why You Need These Meringue Nests in Your Life
Let’s be real – Easter desserts can get repetitive. Another carrot cake? Another batch of sugar cookies shaped like bunnies? yawn
These meringue nests bring something different to the table:
- They’re ridiculously pretty without requiring any actual decorating skills
- The contrast between crispy meringue, tangy curd, and fresh berries is EVERYTHING
- They’re naturally gluten-free (you’re welcome, Cousin Sarah)
- You can make the meringues a day ahead, so you’re not scrambling on Easter morning
- They’re way easier than they look (our little secret)
Easter Meringue Nests
Equipment
- Electric mixer or stand mixer
- Baking sheet
- Parchment paper
- Piping bag (optional but helpful)
Ingredients
For the Meringue Nests
- 4 large egg whites (room temperature)
- 1 cup granulated sugar
- 1 teaspoon vanilla extract
- 1 teaspoon white vinegar
- 1 teaspoon cornstarch
- Pinch of salt
For the Filling
- 1 cup lemon curd (store-bought or homemade)
- 2 cups mixed berries (strawberries, blueberries, raspberries)
- 2 tablespoons powdered sugar (for dusting)
- Optional: A few mint leaves for garnish
Instructions
- Prep Your Battle Station. Preheat your oven to 225°F (107°C) and line a baking sheet with parchment paper. Draw 6-8 circles (about 3-4 inches wide) on the parchment paper, then flip it over so the pencil marks are facing down.
- Beat Those Egg Whites. In a clean, dry bowl (seriously, even a tiny drop of grease will ruin everything), beat the egg whites and salt with an electric mixer until soft peaks form. Think of it like whipped cream that's just starting to hold its shape.
- Add Sugar Gradually. Now, add the sugar one tablespoon at a time while continuing to beat. Don't rush this part – it's the difference between silky meringue and sad, grainy disappointment. Keep beating until the mixture is glossy and forms stiff peaks. You should be able to hold the bowl upside down without anything falling out (though maybe don't test this over your new rug).
- Final Flavor Boost. Gently fold in the vanilla extract, vinegar, and cornstarch. These secret ingredients help create that perfect crispy-outside, chewy-inside texture.
- Shape Your Nests. Spoon or pipe the meringue onto your parchment paper circles. Use the back of a spoon to create a well in the center of each nest. Think bird's nest, not pancake.
- Bake Low and Slow. Bake for 1 hour to 1 hour 15 minutes. The meringues should be crisp on the outside but not browned. Turn off the oven and leave the meringues inside with the door closed for at least 30 minutes or up to an hour.
- The Grand Finale. When you're ready to serve, fill each nest with a generous dollop of lemon curd and top with fresh berries. Dust with powdered sugar and add a mint leaf if you're feeling extra fancy.
Notes
- The meringue nests can be made a day ahead and stored in an airtight container.
- Only fill the nests just before serving or they’ll get soggy.
- If your meringues crack a little, don’t panic! The filling will hide minor imperfections.
- For a pure white meringue, add the vinegar at the very end.
Common Mistakes That’ll Ruin Your Meringue Dreams
- Using a greasy bowl or utensils – Even a tiny bit of fat will prevent your egg whites from whipping properly. Wipe everything down with vinegar first if you’re paranoid (I am).
- Adding sugar too quickly – Dumping it all in at once creates grainy meringue. Nobody wants that sad, sandy texture.
- Opening the oven door while baking – I know it’s tempting to peek, but the temperature change can cause your beautiful nests to collapse faster than my motivation to exercise.
- Filling the nests too far in advance – Unless soggy meringue is your thing (it shouldn’t be), fill these beauties right before serving.
Make It Your Own
- Chocolate Lover’s Version: Fold 2 tablespoons of cocoa powder into your meringue mixture, then fill with chocolate ganache instead of lemon curd. Top with chocolate shavings and raspberries. Hello, chocolate overload!
- Tropical Twist: Replace lemon curd with passion fruit curd or mango puree, then top with kiwi, pineapple, and a sprinkle of toasted coconut. Instant vacation vibes!
- Keto-Friendly Option: Use a monk fruit sugar substitute instead of regular sugar for the meringues. Fill with unsweetened whipped cream and a few low-sugar berries. Your keto friends will weep with joy.
FAQs
Can I make these ahead of time?
The meringue shells can be made 1-2 days ahead and stored in an airtight container. Just don’t add the filling until right before serving.
Why did my meringues crack?
Probably because your oven was too hot or you cooled them too quickly. But honestly? Cracks add character, and the filling covers them anyway.
I have leftover egg yolks. What should I do with them?
Make the lemon curd from scratch! Or homemade ice cream. Or custard. Or just freeze them for later because you’re exhausted from being so impressive with your meringue skills.
Final Thoughts
These Easter meringue nests are basically the culinary equivalent of that friend who effortlessly shows up looking amazing while claiming “Oh, this old thing? I just threw it on!” They’re impressive yet approachable, just like you at your best.
So the next time someone asks if you bought them from a bakery, just smile mysteriously and accept their compliments. Your secret’s safe with me.


