
Ever stared at those gorgeous berry tartlets in bakery windows, only to discover they’re loaded with dairy and eggs? Yeah, me too. But guess what? You can make your own vegan berry tartlets that are so good, even your omnivore friends will be sneaking seconds. And no, you don’t need a culinary degree—just some berries, a sweet tooth, and about 30 minutes of your precious time.
Why This Recipe is Awesome

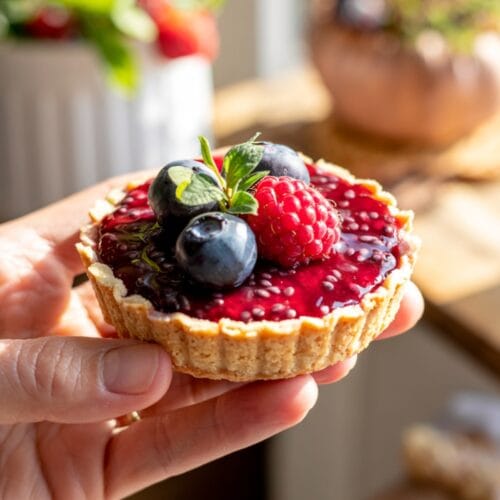
These vegan berry tartlets aren’t just another pretty dessert (though trust me, they’re Instagram-worthy). They’re the perfect balance of “looks impressive” and “actually super easy to make.” The crust is buttery despite containing zero actual butter, and the filling is so bright and fruity it’s practically singing. Plus, they’re portion-controlled, which means you can technically eat two without the guilt that comes with devouring half a pie. That’s just math.
Vegan Berry Tartlets
Ingredients
For the Crust
- 1½ cups almond flour or your favorite gluten-free flour blend if you’re going that route
- ¼ cup coconut oil solid but scoopable (like your emotional walls—firm but penetrable)
- 3 tablespoons maple syrup the real stuff, not that fake pancake sauce
- ½ teaspoon vanilla extract
- Pinch of salt just a pinch, we’re not seasoning a steak here
For the Filling
- 1 cup mixed berries strawberries, blueberries, raspberries—whatever looks good or is on sale
- 2 tablespoons chia seeds those magical little things that make vegan desserts hold together
- 3 tablespoons maple syrup or agave sweet like your personality
- 1 tablespoon lemon juice for that zing!
- ½ teaspoon vanilla extract again, because vanilla makes everything better
For the Optional Glaze
- 2 tablespoons apricot jam
- 1 teaspoon water from the tap, nothing fancy
Instructions
- Preheat your oven to 350°F (175°C). If you’re the type who skips preheating, we need to have a serious talk.
- In a food processor, blend all crust ingredients until they form a dough that sticks together when pressed between your fingers. No food processor? Mix with a fork and then get in there with your hands. Consider it arm day.
- Divide the dough evenly among 12 muffin cups or tartlet molds, pressing it into the bottom and up the sides. Pro tip: wet fingers make this less of a sticky situation.
- Prick the bottoms with a fork (it’s oddly satisfying) and bake for 10-12 minutes until just starting to turn golden. Don’t wander off to check Instagram—these can burn quickly.
- While the crusts are baking, make your filling. In a small saucepan, combine berries, maple syrup, and lemon juice. Bring to a simmer over medium heat.
- Once simmering, mash about half the berries with a fork (anger management, kitchen edition), leaving some whole for texture. Stir in chia seeds and vanilla, then remove from heat.
- Let the filling cool for about 5 minutes—it will thicken as the chia seeds work their gel-like magic.
- When the crusts are done, let them cool for 5 minutes in the pan, then carefully remove to a cooling rack.
- Spoon the filling into the cooled tart shells. If you’re feeling fancy, arrange some additional fresh berries on top.
- For the optional glaze, warm the apricot jam with a teaspoon of water until liquid, then gently brush over the berries for that professional patisserie shine.
- Refrigerate for at least 15 minutes to set (if you can wait that long), then serve and accept the inevitable compliments graciously.
Notes
- These tartlets are best served the day they’re made, but will keep in the refrigerator for up to 2 days. The crust might soften slightly, but they’ll still taste amazing.
- If you’re taking these to a party, assemble them there if possible for maximum wow-factor and minimum soggy-crust-factor.
- For a coconut-free version, try using vegan butter instead of coconut oil in the crust.
- Feel free to experiment with different berries or even stone fruits in summer—mixed berry is just the beginning of your tartlet journey.
- If you’re really short on time, store-bought vegan pie crust can work in a pinch. I won’t tell anyone, promise.
Calories & Nutritional Info
- Calories: Approximately 175 per tartlet
- Fat: 12g (mostly from the good-for-you nuts and coconut oil)
- Carbs: 15g
- Fiber: 3g (thanks, chia seeds and berries!)
- Protein: 3g
- Sugar: 9g (mostly natural from the fruit and maple syrup)
- Gluten-free (if using almond flour as directed)
- Dairy-free (obviously, it’s vegan!)
- Loaded with antioxidants from those beautiful berries
- Contains heart-healthy omega-3s from the chia seeds
Common Mistakes to Avoid
- Overfilling the tartlet shells—unless berry overflow is your aesthetic.
- Skipping the fork-pricking step, then wondering why your tart shells have puffed up like your ex’s ego.
- Using cold coconut oil in the crust. It needs to be soft enough to mix but not completely melted, kinda like Goldilocks’ preferred porridge.
- Expecting these to last more than 24 hours in your house. They won’t—consider making a double batch.
- Not allowing the filling to cool before adding to the shells. Hot filling = soggy bottom, and nobody wants that British Bake Off nightmare.
- Being impatient and not letting them set in the refrigerator. Those 15 minutes make a difference between “pretty good” and “OMG amazing.”
- Forgetting to take photos before they’re all eaten. These are seriously Instagram-worthy.
Alternatives & Substitutions
- Almond flour alternative: Oat flour works well for a nut-free version, though the texture will be slightly different (still delicious, just different).
- Berry alternatives: Try peaches, plums, or cherries in summer, or go wild with tropical fruits like mango and passion fruit if you’re feeling fancy.
- Maple syrup substitutes: Agave, date syrup, or even plain sugar dissolved in a bit of water will work. Each brings its own flavor profile to the party.
- Coconut oil replacements: Vegan butter is your best bet for a similar texture, or try avocado oil for a more neutral flavor.
- Chia seed alternatives: Ground flaxseed makes a decent substitute if that’s what you have on hand, though the filling may be slightly less firm.
- Fancy it up: Add a dollop of coconut whipped cream on top, or a sprinkle of lemon zest for extra zing.
- Make it boozy: A splash of cassis or berry liqueur in the filling takes these from afternoon tea to dinner party status in a heartbeat.
FAQs
Can I make these ahead of time?
You mean you don’t want to be frantically baking while your guests are ringing the doorbell? Smart. Yes, you can make these up to a day ahead, but I’d recommend assembling them no more than 4-6 hours before serving for the best texture. The crust and filling can be made separately two days ahead and kept refrigerated until you’re ready for the final assembly.
Do I really need chia seeds?
Planning to ignore a key ingredient because you don’t have it? Bold move. Chia seeds are pretty important here as they help the filling set without eggs or gelatin. If you’re in a bind, ground flaxseeds can pinch-hit, or you could try cornstarch (about 1 tablespoon, mixed with a little cold water first), but the texture won’t be quite the same.
My tartlets stuck to the pan. What went wrong?
Did you grease the pan? No? Well, there’s your problem. Even with the oil in the crust, a quick spray of cooking oil or a wipe with a paper towel dipped in coconut oil can make all the difference. If they’re still being stubborn, gently loosen the edges with a butter knife before attempting removal.
Can I use frozen berries instead of fresh?
Absolutely! In fact, frozen berries often work better for the cooked filling since they break down more easily. Just thaw them partially before cooking, and maybe skip adding the extra ones on top for decoration—those should be fresh for the best visual impact. Unless the frozen-berry-with-ice-crystals look is what you’re going for.
How do I know when the crust is done?
You’re looking for a light golden color around the edges—think a gentle summer tan, not a full-on beach bum bronze. The centers should be dry to the touch but not hard. Remember, they’ll firm up more as they cool, so don’t worry if they seem a bit soft when they first come out of the oven.
These are too good. How do I stop eating them all in one sitting?
Is that really a problem? Kidding (sort of). Try freezing some! They actually freeze surprisingly well for up to a month. Thaw in the refrigerator overnight, and while the texture of the berries might change slightly, they’ll still be delicious. Or, you know, just invite friends over to help you devour them. Sharing is caring.
Final Thoughts
So there you have it—vegan berry tartlets that are as easy as they are impressive. Whether you’re a seasoned plant-based baker or just dipping your toes into the vegan dessert pool, these little beauties deserve a spot in your recipe collection. They’re perfect for everything from fancy tea parties to “it’s Tuesday and I deserve something pretty” moments. Now go forth and create some berry magic—your taste buds will thank you.


