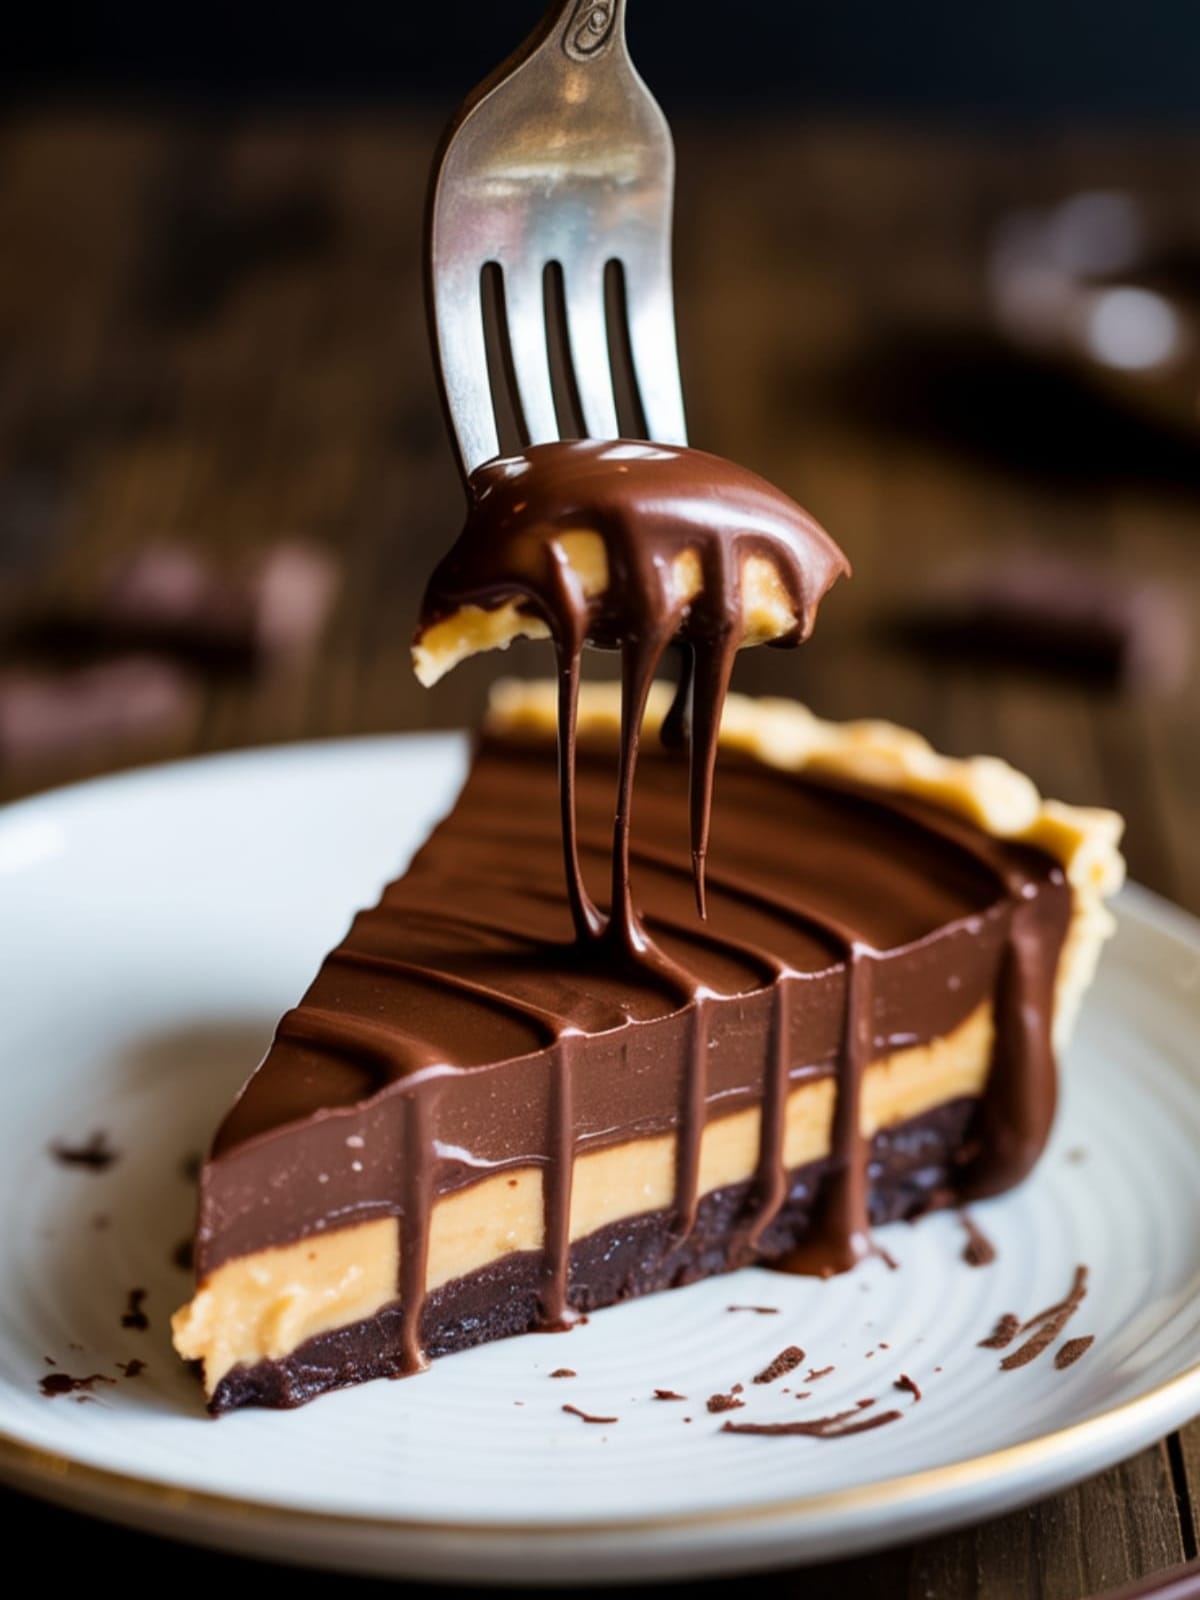
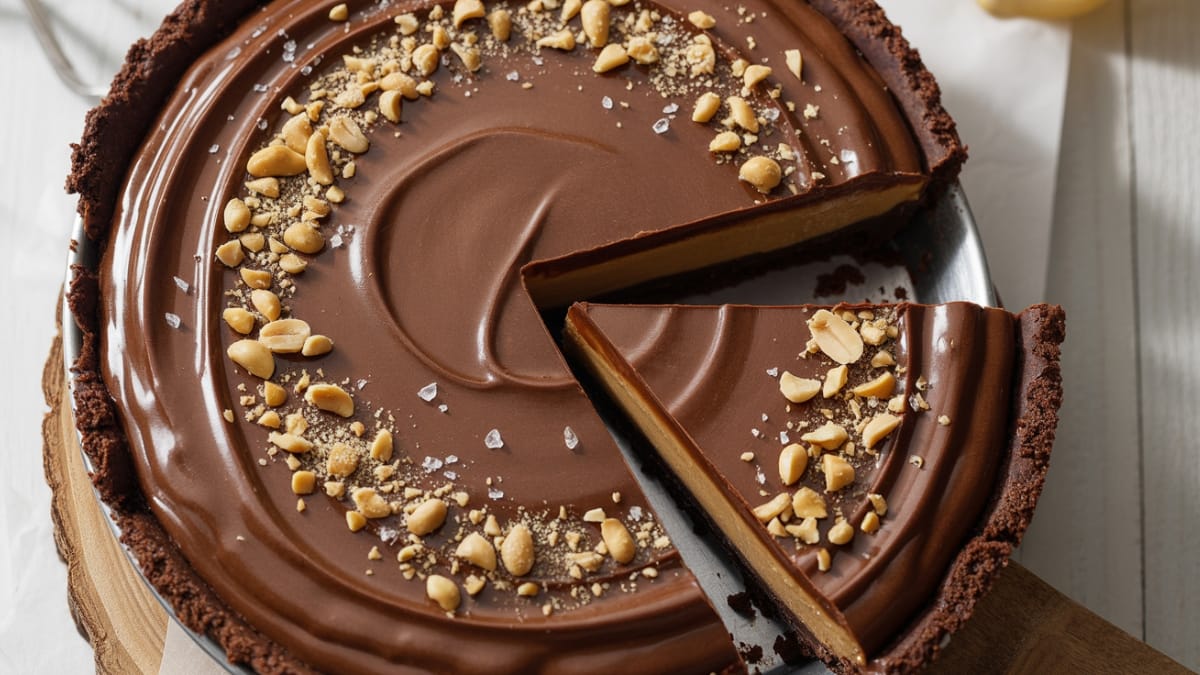
Picture this: creamy peanut butter filling nestled in a chocolate cookie crust, topped with a silky chocolate ganache that melts on your tongue. That’s the magic of Chocolate Peanut Butter Pie—the dessert that makes everyone at the table fall silent with that first heavenly bite. This isn’t just any dessert; it’s the perfect harmony of America’s favorite flavor combination transformed into a show-stopping pie that requires zero baking skills.
Whether you need a last-minute dessert for unexpected guests or something to satisfy that persistent sweet tooth, this pie delivers with minimal effort and maximum impact. The best part? Your oven gets to take the day off.
Why This Recipe is Awesome
What makes this Chocolate Peanut Butter Pie truly special is its perfect balance of rich, creamy textures and complementary flavors that dance on your palate.
The salty-sweet combination triggers those pleasure centers in your brain that make you go back for “just one more slice”—we’ve all been there! Unlike many impressive desserts, this one requires no baking expertise or specialty equipment. With just a few store-bought ingredients and about 15 minutes of active preparation, you’ll create a dessert that looks and tastes like it came from a high-end bakery.
The versatility is another winning feature—dress it up with chocolate shavings and sea salt for a dinner party, or keep it casual for a family movie night. As someone who’s tested countless dessert recipes, I can assure you: this is the one guests will beg you to make again and again.
Equipment needed: Food processor or blender, mixing bowl, electric mixer, 9-inch pie pan, spatula, refrigerator
Chocolate Peanut Butter Pie
Ingredients
- 24 chocolate sandwich cookies like Oreos, finely crushed
- 5 tablespoons unsalted butter melted
- 1 cup smooth peanut butter not natural style
- 8 oz cream cheese softened
- 1 cup powdered sugar
- 1 teaspoon vanilla extract
- 1 cup heavy whipping cream
- 1 cup semi-sweet chocolate chips
- 1/3 cup heavy cream for ganache
- Optional garnishes: chopped peanut butter cups crushed peanuts, sea salt
Instructions
- Prepare the crust by combining crushed chocolate cookies and melted butter in a bowl until the mixture resembles wet sand. Press firmly into a 9-inch pie pan, creating an even layer on the bottom and up the sides. Refrigerate while preparing the filling.
- Make the peanut butter filling by beating cream cheese and peanut butter with an electric mixer until smooth and fully incorporated, about 2 minutes. Add powdered sugar and vanilla, then continue beating until the mixture is light and fluffy.
- Whip the heavy cream in a separate bowl until stiff peaks form. This usually takes 3-4 minutes on medium-high speed. The cream should hold its shape when you lift the beaters.
- Fold the whipped cream into the peanut butter mixture using a spatula with gentle, sweeping motions. Continue folding until no white streaks remain, being careful not to deflate the mixture.
- Transfer the filling to the prepared crust, spreading it evenly with a spatula. Smooth the top and refrigerate while preparing the ganache.
- Make the chocolate ganache by placing chocolate chips in a heat-proof bowl. Heat 1/3 cup heavy cream until just simmering, then pour over the chocolate. Let sit for 1 minute, then stir until smooth and glossy.
- Pour the ganache over the peanut butter layer, tilting the pie to create an even coating. If adding toppings, sprinkle them on while the ganache is still wet.
- Refrigerate the pie for at least 4 hours or overnight until completely set and chilled through. This waiting period is crucial for perfect slicing and flavor development.
Notes
- For the crispest crust, chill it for 20 minutes before adding the filling.
- Use conventional creamy peanut butter (like Jif or Skippy) rather than natural peanut butter, which can separate and create an oily texture.
- The pie can be made up to 2 days ahead and stored covered in the refrigerator.
- For cleaner slices, dip your knife in hot water and wipe dry between cuts.
- If you’re short on time, you can use a pre-made chocolate cookie crust from the store.
Calories & Nutritional Info
- Calories: Approximately 550 per slice (based on 8 servings)
- Fat: 42g (23g saturated)
- Carbohydrates: 38g (28g sugars)
- Protein: 10g
- Allergens: Contains dairy, wheat, peanuts
- Not suitable for: Vegan, dairy-free, gluten-free, or nut-free diets without modifications
Common Mistakes to Avoid
- Using warm ingredients: Ensure cream cheese is fully softened but not melted. Cold cream cheese will create lumps in your filling.
- Overbeating the whipped cream: Stop whipping as soon as stiff peaks form—going further can turn it into butter.
- Rushing the chilling time: The full 4+ hours of refrigeration is essential for the pie to set properly and develop its best flavor.
- Using natural peanut butter: The oils separate and can make your filling grainy and unstable.
- Overheating the ganache: If the cream is too hot or you microwave the mixture too long, the chocolate can seize or become grainy.
Alternatives & Substitutions
- Gluten-free option: Use gluten-free chocolate cookies for the crust.
- Lower sugar version: Reduce powdered sugar to 2/3 cup and use dark chocolate chips instead of semi-sweet.
- Nut allergy alternative: Substitute cookie butter or sunflower seed butter for peanut butter (flavor will change but texture remains similar).
- No cream cheese? Use 8 oz mascarpone cheese instead for an even richer result.
- Crust variations: Try graham crackers, chocolate graham crackers, or even pretzel crumbs for a saltier base.
- Dairy-free adaptation: Use dairy-free cream cheese, coconut cream (chilled and whipped), and dairy-free chocolate chips.
FAQs
Can I freeze this Chocolate Peanut Butter Pie?
Absolutely! This pie freezes beautifully for up to a month. Wrap it tightly in plastic wrap and then foil before freezing. Thaw overnight in the refrigerator before serving for the best texture.
Why is my filling not firm enough?
This usually happens if the cream wasn’t whipped to stiff peaks before folding, or if natural peanut butter was used. Make sure to use conventional creamy peanut butter and properly whipped cream. Additional chilling time can also help.
Can I make this with crunchy peanut butter?
Yes, if you enjoy texture in your pie! Crunchy peanut butter will create little peanut bits throughout the filling, adding a delightful contrast to the otherwise smooth dessert.
How do I prevent the crust from crumbling when serving?
Press the crust mixture very firmly into the pie pan using the bottom of a measuring cup. Chilling the crust before filling also helps it set. For serving, use a sharp knife dipped in hot water and wiped dry between cuts.
What’s the best way to store leftovers?
Cover loosely with plastic wrap or store in an airtight container in the refrigerator for up to 5 days. The flavor actually improves after the first day as the components meld together!
Final Thoughts
There’s something magical about the way chocolate and peanut butter come together in this no-bake pie. It’s the perfect solution for last-minute entertaining or satisfying serious dessert cravings without turning on the oven. Whether you’re making it for a special occasion or just because it’s Wednesday, this Chocolate Peanut Butter Pie delivers the comfort and luxury we all deserve sometimes. Go ahead—treat yourself and the people you love!


