Ever wanted to be the cool parent/aunt/friend who shows up with a treat that makes everyone say “Oh my gosh, how cute!” but you also value your sanity and don’t want to spend four hours on a dessert? These Easter Bunny Popcorn Balls are your answer. They’re adorable, delicious, and—best of all—surprisingly simple to make. Think of them as the dessert equivalent of putting your hair in a messy bun but somehow looking like you just stepped out of a salon.
Why This Recipe is Awesome
This isn’t just any popcorn ball recipe—it’s the Easter upgrade that transforms a classic treat into something that looks like you have way more patience and artistic ability than you actually need for this recipe.
The visual impact is immediate. Something about those candy ears and cute little faces just screams “I spent way more time on these than I actually did.” The perfect crime!
What I love most about this recipe is how customizable it is. Use different colored candy melts to create various bunny colors, swap out candies based on what you have on hand, or let kids help with decorating to keep them busy while you secretly eat the “imperfect” ones as quality control.
Plus, they combine the nostalgic appeal of popcorn balls with Easter fun, creating a treat that both kids and adults will love. And unlike some Easter desserts that are all sugar and no substance, these actually taste as good as they look.
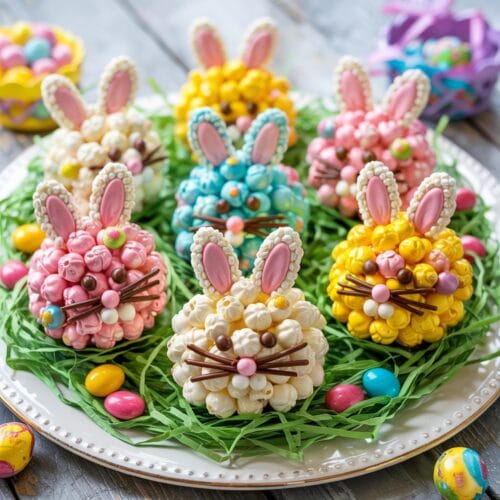
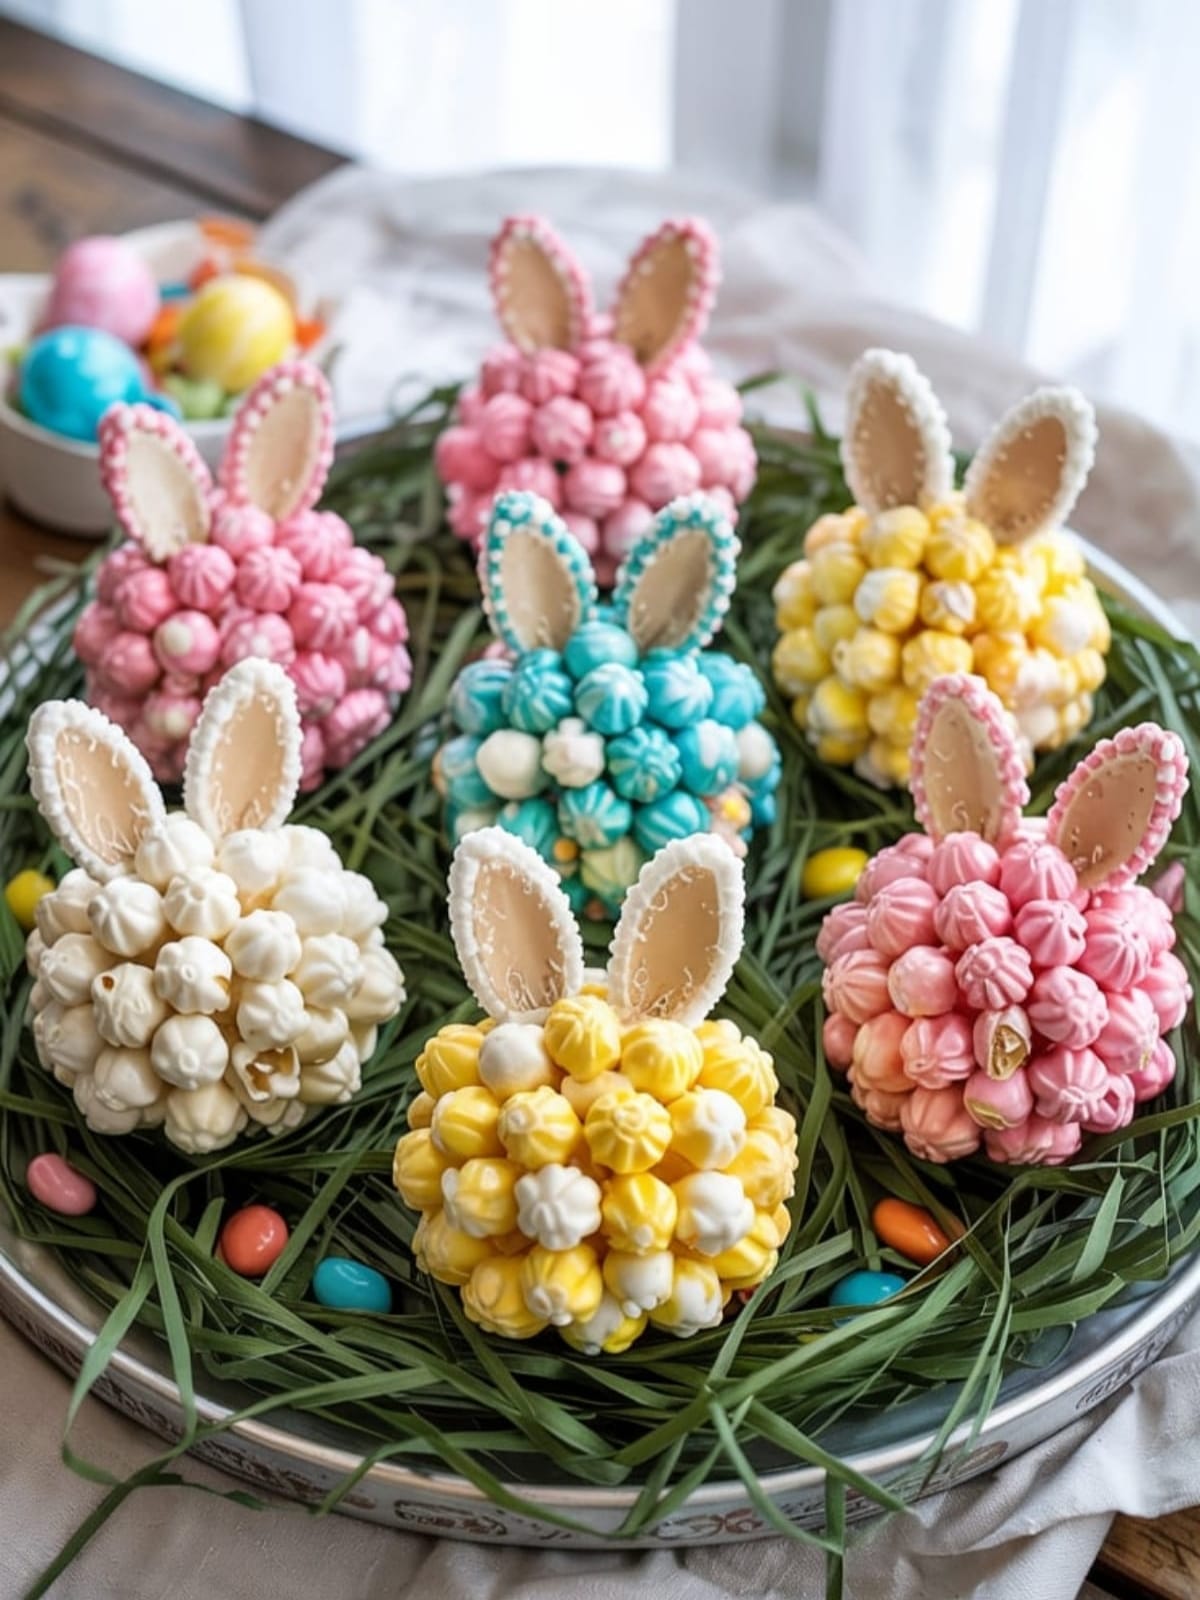
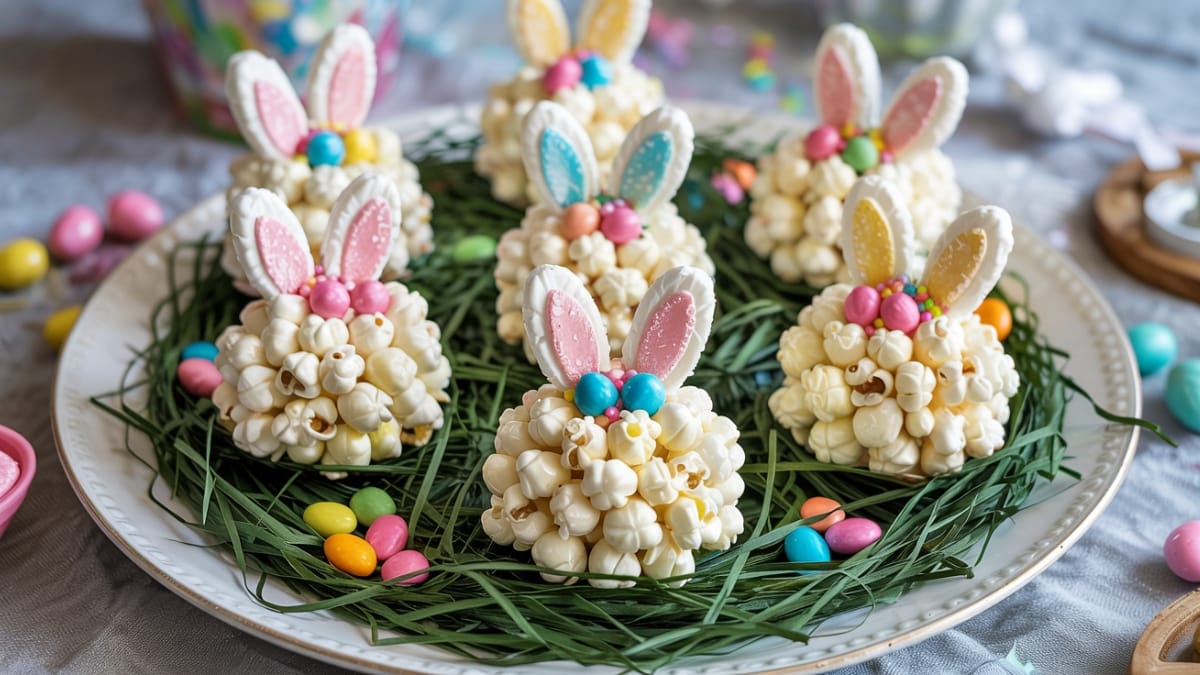
Easter Bunny Popcorn Balls
Ingredients
For the Popcorn Balls
- 10 cups popped popcorn about 1/2 cup unpopped kernels
- 4 tablespoons butter
- 1 10 oz bag marshmallows (about 40 regular marshmallows)
- 1/4 teaspoon salt
- 1 teaspoon vanilla extract
- Optional: 1 cup white chocolate chips melted (for extra stickiness and flavor)
For Decorating
- 1 cup white candy melts for bunny coating
- Optional: pastel-colored candy melts pink, blue, yellow, or green for variety
- 24 white chocolate wafer cookies like Ghirardelli melting wafers for ears
- Pink candy melts or pink frosting for inner ears
- Mini chocolate chips or brown M&Ms for eyes
- Pink jelly beans or small pink candies for nose
- Black decorating gel or melted chocolate for whiskers
- Assorted Easter sprinkles optional
Instructions
- Prep your workspace. Line a baking sheet with wax paper or parchment paper. Have all your decorating ingredients measured and ready—this makes the process much smoother.
- Make perfect popcorn. Pop your popcorn using your preferred method. Remove any unpopped kernels (those are tooth-breakers!), and place the popped corn in a large bowl. If using microwave popcorn, choose a plain or lightly salted variety.
- Create the sticky mixture. In a large pot over low heat, melt the butter. Add marshmallows and stir constantly until completely melted and smooth. Remove from heat and stir in salt and vanilla extract.
- Optional flavor boost: If using white chocolate chips, melt them in the microwave in 30-second intervals, stirring between each, until smooth. Add to the marshmallow mixture.
- Combine everything. Pour the marshmallow mixture over the popcorn and gently fold together using a wooden spoon or spatula until all the popcorn is evenly coated. Work quickly as the mixture starts to set fast!
- Shape your bunnies. Once the mixture is cool enough to handle but still pliable (about 2-3 minutes), lightly coat your hands with cooking spray or wear disposable gloves. Shape the mixture into balls about the size of a tennis ball. This should make 10-12 bunny heads. Place them on the prepared baking sheet.
- Create a flat bottom. Gently press the bottom of each ball to flatten it slightly so your bunnies don't roll away.
- Prep the ears. Melt the white candy melts in a microwave-safe bowl according to package directions. Dip each white chocolate wafer cookie halfway into the melted candy, then set on wax paper to firm up slightly. These will be your bunny ears.
- Add ear details. Once the white coating on the cookies has set slightly, dip the tips in melted pink candy melts or use pink frosting to create the inner ear. Allow to harden completely.
- Coat the bunnies. If desired, dip the top half of each popcorn ball into melted white or pastel candy melts for a smoother surface to decorate. This step is optional but creates a more finished look.
- Attach the ears. Press two ear cookies into the top of each popcorn ball while the candy coating is still slightly soft. If you didn't dip the balls, use a small amount of melted candy to "glue" the ears in place.
- Add facial features. Press mini chocolate chips or brown M&Ms into place for eyes, add a pink jelly bean or candy for the nose, and use black decorating gel or melted chocolate to draw whiskers.
- Final touches. Add any additional sprinkles or decorations as desired. Let the bunnies set completely, about 15 minutes, before serving.
- Storage: These are best enjoyed within 1-2 days. Store in an airtight container or wrap individually in plastic wrap.
Notes
- Popcorn tip: Freshly popped popcorn works better than pre-packaged because it has less oil and butter already on it.
- For brightly colored bunnies, add a few drops of food coloring to the marshmallow mixture before adding it to the popcorn.
- Working with slightly damp hands makes shaping the popcorn balls easier and less sticky.
- If the popcorn mixture cools too much to shape, place it back over low heat briefly to soften.
- Make-ahead tip: You can make the basic popcorn balls a day ahead and add the decorative elements the next day.
- For a fun variation, use caramel popcorn instead of regular (though note that this makes the final treat much sweeter).
- Use kitchen scissors to snip any popcorn pieces that are sticking out too far and ruining your bunny shape.
Calories & Nutritional Info
- Calories: Approximately 250-300 per bunny popcorn ball
- Protein: 2g
- Fat: 10g
- Carbs: 45g
- Fiber: 1g
- Sugar: 30g
- Sodium: 150mg (varies with popcorn type)
- Allergen information: Contains dairy. May contain soy depending on candy products used. Check ingredients for potential allergens like nuts if making for someone with allergies.
Common Mistakes to Avoid
- Using hot popcorn. Let your popcorn cool completely before adding the marshmallow mixture, or it will become soggy.
- Overheating the marshmallows. This makes them tough and less pliable. Low heat and constant stirring are key.
- Working too slowly. The marshmallow mixture sets quickly, so have all your ingredients ready before you start melting.
- Making the balls too large. Tennis ball-sized is perfect; any larger and they become unwieldy to eat.
- Forgetting the salt. It may seem minor, but that little bit of salt balances the sweetness perfectly.
- Decorating while the coating is fully hardened. The candies need something slightly sticky to adhere to, so don’t wait too long to add facial features.
- Using old marshmallows. Fresh marshmallows melt better and create a better texture. If yours are a bit stale, add an extra tablespoon of butter to compensate.
Alternatives & Substitutions
- Different popcorn types: Try kettle corn for a sweet-salty combo, or caramel corn for extra sweetness.
- Allergy-friendly version: Use dairy-free butter substitute and allergy-friendly candy for decorating.
- Cookie alternatives for ears: Graham crackers cut into ear shapes, oval shortbread cookies, or even cardboard cutouts covered in candy melts.
- No candy melts? White chocolate chips with a teaspoon of vegetable oil works in a pinch.
- Nose options: Pink Starburst cut into small pieces, small pieces of strawberry Laffy Taffy, or even a dab of pink frosting.
- Eye alternatives: Junior Mints, chocolate sprinkles, or black icing dots.
- Flavor variations: Add 1/2 teaspoon of almond extract for a different flavor profile, or mix in 1/4 cup of mini pastel chocolate chips to the popcorn mixture.
- Color variations: Tint the marshmallow mixture with food coloring for pastel bunny bodies, or use colored candy melts for different colored bunnies.
FAQs
Can I make these ahead of time for a party?
Yes! You can make the popcorn balls 1-2 days ahead of time. For the freshest taste and texture, store them in an airtight container and add the decorative elements the day of your event.
My marshmallow mixture hardened before I could shape all the balls. Help!
If your mixture gets too firm, place it back over very low heat for 30 seconds to a minute, stirring constantly, until it’s pliable again. You can also place it in the microwave for 10-15 seconds.
How can I involve kids in making these?
Kids can help with several steps! Let them help shape the popcorn balls (once the mixture has cooled enough), and they can definitely help with decorating. Assign them specific tasks like placing the eyes or nose while you handle anything involving hot melted candy.
Can I use microwave popcorn instead of air-popped?
Yes, just choose a lightly salted or natural flavor rather than a heavily buttered variety. The extra butter and flavoring in some microwave popcorns can make the final texture greasy.
How do I store these if I want to make them as gifts?
Wrap each bunny individually in clear cellophane, tie with a pastel ribbon, and attach a cute tag. They should stay fresh for a couple of days. For best results, make them no more than a day before gifting.
My popcorn balls aren’t holding their shape. What went wrong?
You might not have used enough marshmallow mixture, or perhaps the marshmallows weren’t completely melted. The mixture should be sticky enough that the popcorn holds together firmly when pressed. Adding a bit of melted white chocolate to the marshmallow mixture can help create a firmer bond.
Can I freeze these for later?
The basic popcorn balls freeze reasonably well for up to a month, but the decorative elements won’t fare as well. If you want to freeze them, do so before adding the ears and facial features, then decorate after thawing.
Final Thoughts
Easter Bunny Popcorn Balls are proof that you don’t need to be a pastry chef to create adorable holiday treats that impress everyone at the gathering. They strike that perfect balance between homemade charm and legitimate deliciousness, and their customizable nature means they can be as simple or elaborate as your time and patience allow. Plus, there’s something undeniably fun about transforming a nostalgic treat like popcorn balls into festive spring bunnies that both kids and adults will love. So channel your inner Martha Stewart (the relaxed version who occasionally takes shortcuts), gather your ingredients, and prepare to accept compliments on your apparent craftiness—even if you know the secret was actually just choosing the right recipe.


